Audi A4 Owners Manual
BulbsSelf-help / Fuses and bulbs / Bulbs
Changing bulbs
Changing bulbs requires a certain degree of practical skill.
You can change the following bulbs for exterior lights yourself:
- • Halogen headlights: Bulb for dipped headlights
- • Halogen headlights: Bulb for main beam headlights
- • Bulb for fog light
- • Bulbs for rear lights in boot lid
- • Bulbs for rear lights in side panel
- • Bulbs for number plate light
The following bulbs should only be changed by a qualified workshop:
- • Halogen headlights: Bulb for turn signals
- • Halogen headlights: Bulb for side lights
- • Xenon headlights*: Bulb for turn signals
- • Xenon headlights*: Light source for daytime running lights/parking lights
- • Bulb for headlights: Bi-xenon lights ⇒

- • Light source for turn signal in exterior mirror housing
- • Light source for high-level brake light
As a rule, you require a certain degree of practical skill to change defective bulbs. This applies in particular to those bulbs which are only accessible from the engine compartment.
If in doubt, we recommend that you have defective bulbs changed by a qualified workshop or qualified mechanic.
If you do decide to change bulbs in the engine compartment yourself, be aware
of the safety risks involved ⇒  .
.
Types of bulbs
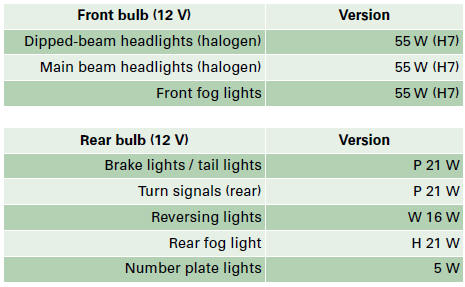
You must only replace a bulb with a bulb of the same type. Information regarding e.g. the wattage can be found on the base of the bulb.

![]() WARNING
WARNING
- • Take particular care when working on components in the engine compartment if the engine is warm - risk of burns!
- • Bulbs are sensitive to pressure. The glass can break when you touch the bulb, causing injury.
- • Incorrect handling of the high-voltage element of xenon gasdischarge bulbs* can have potentially fatal consequences.
- • When changing bulbs, please take care not to injure yourself on sharp edges, in particular on the headlight housing.
![]() Caution
Caution
- • Always remove the ignition key before carrying out any work on the electrical system - danger of short circuiting!
- • Switch off the lights or parking lights before you change a bulb.
- • Take good care to avoid damaging any components.
- • Removing the lights in particular can lead to the paintwork becoming damaged. This is another reason why we recommend having the bulbs changed by a qualified workshop.
![]() For the sake of the environment
For the sake of the environment
Please ask your specialist retailer how to dispose of used bulbs in the proper manner.
![]() Note
Note
Place the parts you have removed on a soft cloth so that they do not become scratched.
- • Please check at regular intervals that all lighting (especially the exterior lighting) on your vehicle is functioning properly. This is not only in the interest of your own safety, but also in that of all other road users.
- • Before changing a bulb, make sure you have the correct new bulb.
- • Do not touch the glass part of the bulb with your bare hands, use a cloth or paper towel instead. Otherwise, the fingerprints left on the glass will vaporise as a result of the heat generated by the bulb, be deposited on the reflector and impair its surface.
Bulbs with a bayonet fastener
Bulbs with a bayonet fastener must be changed as follows:
Removing the bulb
– Lightly press the defective bulb into the bulb holder, then turn it anti-clockwise
and remove it.
– Do not touch the glass part of the new bulb with your bare hands, use a cloth
or paper towel instead.
Fitting the bulb
– Fit the new bulb, pressing it into the bulb holder, and turn it clockwise as
far as it will go.
– If necessary, use a cloth to remove any fingerprints from the glass part of the
bulb.
Bulbs with a bayonet fastener

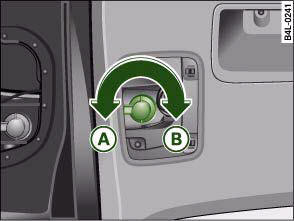
Diagram: Bulb holder with a bayonet fastener
In the case of bulb holders with a bayonet fastener please proceed as follows:
Removing the bulb holder
– Turn the bulb holder in the direction of the arrow A ⇒ fig. 287 as far as it will go and then take the bulb holder out of the light unit.
Fitting the bulb holder
– Insert the bulb holder into the light unit, making sure you keep the bulb holder
straight, i.e. the rubber seal makes even contact all around.
– Turn the bulb holder in the direction indicated by the arrow B ⇒ fig. 287 as far
as it will go.


