
Audi A4 Owners Manual
Removable towing bracketDriving tips / Towing a trailer / Removable towing bracket
Introduction
Special care is required when fitting and removing the towing bracket.
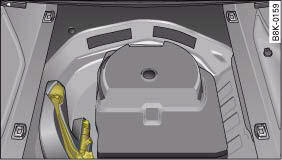
Luggage compartment with towing bracket
The removable ball joint attachment for the towing bracket is carried under the floor panel on the left-hand side of the luggage compartment and is secured by a strap.
The ball joint can be fitted and removed by hand.
![]() WARNING
WARNING
- • Never use tools of any kind when fitting and removing the ball joint. This could damage the mechanism which locks the ball joint in place and impair its safety (accident risk).
- • Secure the ball joint again with the strap when you have finished using it.
![]() Note
Note
- • Do not attempt to modify or repair the ball joint or other towing bracket components.
- • Should you have any difficulties when using the towing bracket, or suspect that it is not fitted properly, contact a qualified workshop.
- • Before setting off, always check that the ball joint is secured properly ⇒ page 238.
- • Never disengage the ball joint with the caravan / trailer still hitched or with a bicycle rack or similar accessory still attached.
- • It is advisable to remove the ball joint when you are not towing a trailer. Fold the socket back to its original position so that the mounting fixture is properly closed.
- • The ball joint must be removed if you intend to clean the car with a steam cleaning attachment. Make sure that the mounting fixture is properly closed.
- • For installation and removal of the ball joint we recommend that the gloves provided be used.
Fitting the ball joint (step 1)
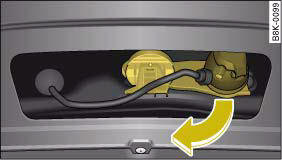
Area below rear bumper: Folding down the socket
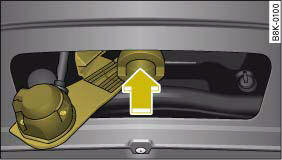
Socket (folded down)
– Fold the socket unit all the way out in the direction of the arrow ⇒ fig. 236.
– The cover piece is held automatically in the open position.
– Check that the mounting for the towing bracket, which will now have become visible
-arrow- ⇒ fig. 237, is free of dirt, and clean if necessary ⇒
 .
.
![]() WARNING
WARNING
It is important to keep the mounting fixture clean. Otherwise the ball joint may fail to engage securely (accident risk).
Fitting the ball joint (step 2)
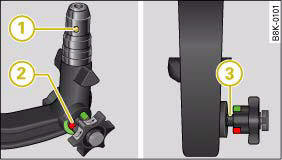
Removable towing bracket: Ball joint
The spring mechanism inside the ball joint must be in the "ready" position.
– Check that the red marking 2 ⇒ fig. 238 on the knob is inside the green zone
on the ball joint.
– Check that the locking ball 1 is inside the hole in the shaft section of the ball
joint.
– Check that the knob protrudes visibly from the ball joint, so that there is a
clear gap 3 between the knob and the ball joint.
The ball joint can only be installed if the internal spring mechanism is in the ready position.
Fitting the ball joint (step 3)
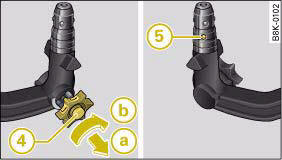
Removable towing bracket: Setting the spring mechanism to the "ready" position
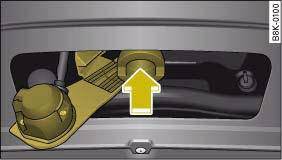
Removable towing bracket: Inserting the ball joint
Setting the spring mechanism to the "ready" position (if required)
– Insert the key 4 ⇒ fig. 239 for locking the ball joint into the lock on the
knob and turn it clockwise.
– Pull out the knob in direction a, hold and turn in direction b until the locking
ball 5 engages ⇒  .
.
Inserting the ball joint
– With the spring mechanism in the “ready” position, insert the ball joint into
the mounting fixture and push it upwards, fig. 240 in the direction indicated (arrow)
⇒  . The spring mechanism should then
– Lock the ball joint by turning the key anti-clockwise.
– Take out the key and press the cover cap provided onto the lock.
![]() WARNING
WARNING
- • If it is not possible to set the spring mechanism to the "ready" position as described above, do not use the ball joint. Please take your vehicle to a qualified workshop.
- • To avoid injury, keep your hands away from the knob and the cover piece when inserting the ball joint into the mounting fixture.
![]() Note
Note
Make sure that the knob can turn freely when the ball joint is inserted.
Fitting the ball joint (step 4)
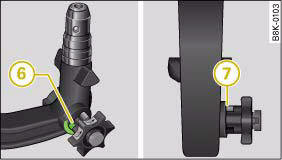
Removable towing bracket: Safety check
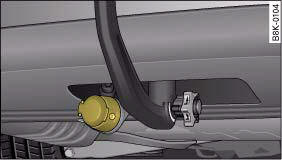
Area below rear bumper: Electrical socket for trailer
Safety check
– Check that the green marking 6 ⇒ fig. 241 on the knob is inside the green zone
on the ball joint.
– Check that the knob is directly against the ball joint, so that there is no gap
7 between the knob and the ball joint.
– Check that the ball joint is locked and the key is removed (so that the knob cannot
be pulled out).
– Check that the ball joint fits tightly in the mounting fixture (try moving it
about to check).
Electrical socket for trailer
– The cable of the towing bracket can be connected to the socket, fig. 242.
If the safety check is not satisfactory, the ball joint must be fitted again properly.
![]() WARNING
WARNING
To avoid accidents, the ball joint must meet all the safety requirements listed in the safety check. The towing bracket must not be used if any one of these requirements is not met. If this is the case, you should contact a qualified workshop.
Removing the ball joint
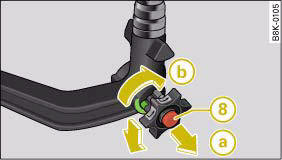
Removable towing bracket: Removing the ball joint
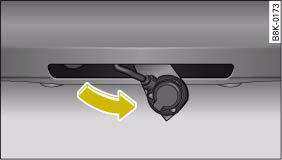
Area below rear bumper: Folding up the socket
– Take off the cover cap and insert the key a ⇒ fig. 243 in the lock on the knob.
– Unlock the ball joint by turning the key clockwise.
– Take hold of the ball joint and pull out the knob in direction a.
– Keep hold of the knob and turn it as far as it will go in direction b.
– Release the knob. The spring mechanism will remain in the "ready" position ⇒
 .
.
– Then swivel the socket up ⇒ fig. 244 as far as it will go. The mounting fixture
will be closed automatically.
– Put away the ball joint attachment under the floor panel in the luggage compartment.
![]() WARNING
WARNING
Make sure that the socket unit has closed off the mounting fixture of the towing bracket properly. Otherwise the ball joint may fail to engage securely if dirt accumulates in the mounting fixture.
Towing bracket (retrofitting)
If required, the vehicle can be retrofitted with a towing bracket.
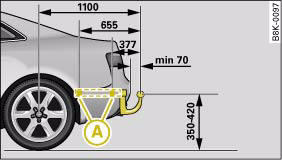
Positions of securing points (side view)
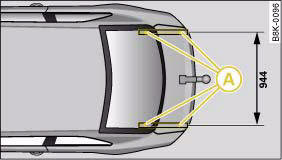
Positions of securing points (from above)
If a towing bracket is to be fitted after the car is purchased, this must be done according to the instructions of the towing bracket manufacturer.
The securing points, which are marked by an A in the illustrations ⇒ fig. 245 and ⇒ fig. 246, are located under the vehicle.
Audi dealers are familiar with the method of installation and any modifications which may be required for the cooling system.
![]() WARNING
WARNING
- • If a towing bracket is retrofitted, the installation should be carried out by a qualified workshop.
- • If the towing bracket is incorrectly fitted, this could cause a safety risk.
- • For your own safety, please observe the instructions provided by the manufacturer of the towing bracket.
![]() Caution
Caution
If the connector socket is not fitted correctly, this could cause damage to the vehicle's electrical system.


